Coconut hearts candy is a fun and indulge way to enjoy candy hearts with your loved ones. Perfect for Valentine’s Day, Friendsgiving or just to tell your family and friends you care.
If you love bounty of almond joy chocolate I think you’ll love these chocolate covered coconut hearts too and if you are looking for more desserts, we’ve got some Rice Krispie treat variations for you to try and make sure to try our brownie balls too.

Chocolate covered coconut hearts recipe
These Chocolate covered coconut hearts are a simple, no-bake candy perfect for celebrating Valentine’s Day. Sometimes called coconut haystacks or chocolate coconut mounds, they consist of sweetened shredded coconut held together by condensed milk, then covered in melted chocolate.
We’ll be shaping the mixture into hearts with the help of a heart mold (👈 affiliate link) giving them a cute, on-theme look.

Why you’ll love this recipe
- They take just 3 ingredients and 10 minutes to throw together
- The combo of chocolate and coconut is a crowd-pleaser.
- Shaping them into hearts makes them perfect edible Valentine’s gifts
- Customizable by adding nuts, sprinkles, dried fruit or crushed candy

Ingredients
- Shredded coconut
- White chocolate melting wafers
- Dark chocolate melting wafers
- Condensed milk

How to make coconut hearts candy
This is an overview of the recipe with step by step photos. Scroll down to end of post for a printable recipe card with the amount of ingredients and full recipe instructions.
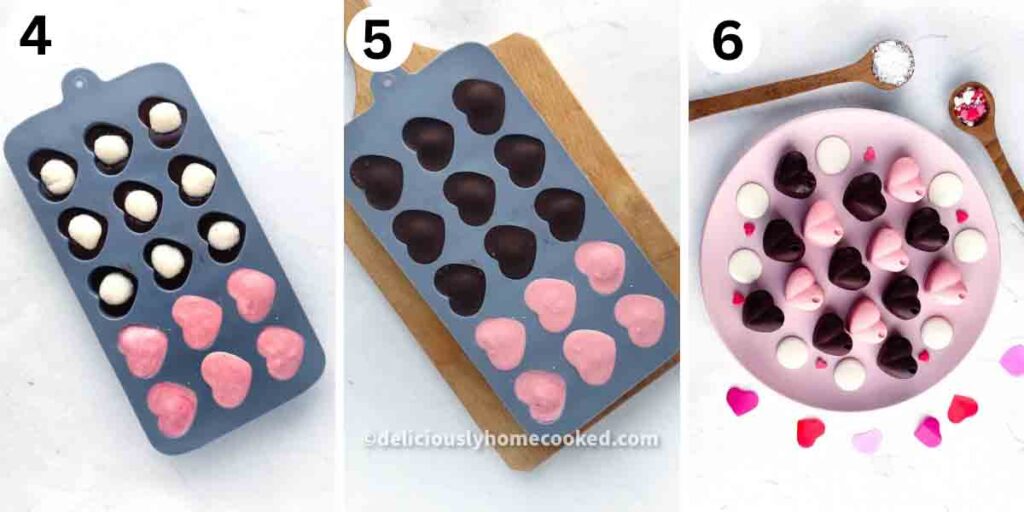
Mix shredded coconut with condensed milk in a bowl. Scoop out by 1 heaping tablespoon full. Roll into small balls, and place on a cutting board or a parchment paper lined baking sheet. Refrigerate
In the mean time, melt chocolate wafers in a double boiler or microwave. Add a few drops if gel food color to the white to form pink.
Pipe pink melted chocolate from a pipping bag into the mold, put the chilled coconut balls in the middle and pipe more melted chocolate over the coconut balls till it’s covered completely.

Repeat same process for the melted dark chocolate. Transfer to the refrigerator to set for about 30 mins before serving.
Storage instructions
These are best stored in the refrigerator for up to 5 days or in the freezer for up to 3 months.
Helpful Tips
- Use high quality shredded coconut for best texture and flavor.
- Use gel food color instead of water based food color to prevent the chocolate from seizing. Alternatively buy pink chocolate wafers instead of white.
- A piping back will help you with getting the chocolate into the cavities of the mold better.
FAQs
Milk, dark, white and candy coating all work well.
No the mold will help you with this. If you’d rather not make hearts, you can roll them into balls.
I haven’t tried it with sweetened coconut. I would think it would make it too sweet. If you do try it out please let us know.
You can add some sprinkles or crushed nuts the coconut, condensed milk mix nuts, crushed candy canes, or dried fruit work too.
More easy desserts to try
- 4th of July Oreos
- Christmas Rice Krispie treats.
- Check out all our Home Cooked Recipes
These 3-ingredient chocolate covered coconut hearts candy make impressive yet easy homemade candy for Valentine’s Day gifting or dessert. Their sweet coconut flavor and pretty candy coating is sure to delight your special someone.
Thank you for visiting my Virtual kitchen! If you found this recipe helpful, please leave a comment below and don’t forget to share this recipe with family and friends.
Happy Cooking!
Love it? Pin it! Remember to follow @DeliciouslyHomeCooked on Pinterest for more recipes!
Looking for more tried and tested Home-cooked recipes? Sign up for our Deliciously Home Cooked Newsletter and Follow along on Facebook, Instagram, Pinterest.

Coconut hearts candy recipe
Equipment
- Silicon molds
Ingredients
- 1 cup unsweetened shredded coconut
- ¼ cup condensed milk
- 3 drops of red dye
- pinch of salt
- ½ cup candy melts
- ½ cup white candy melts
Instructions
- In a bowl, mix together condensed milk, and salt and shredded coconut. The mixture should be soft and slightly sticky.
- Roll about 2 teaspoons of the coconut mixture into small balls. Arrange on a parchment paper baking sheet and chill them in the refrigerator for 20 minutes.
- Melt the white chocolate in the microwave on medium power at 20 mins interval stirring in between until fully melted. Add a few drops of the food color and mix to get a pink color.
- Using a pipping bag , fill the silicone molds halfway. Add the coconut filling (balls) and fill the molds to the top.
- Melt the dark chocolate and repeat the same process.
- Place the molds on a cookie rack before transferring to freezer for 40 minutes.
- When ready to serve, unmold the candies then place the finished candies on a plate to serve.
Nutrition